Gone are the days when achieving smooth, hair-free skin was a luxury only afforded by costly salon appointments. Welcome to the era of permanent hair removal at home, where convenience meets efficiency. With advancements in technology, what once required professional assistance can now be accomplished with ease in the comfort of your own space. This revolution not only saves time but also ensures privacy and comfort, making it an appealing option for many. Whether you're tired of the endless cycle of shaving and waxing or simply looking for a more lasting solution, diving into the world of at-home permanent hair removal might just be the game-changer you need.
Key Takeaways
- Start by learning about hair removal. Know the different methods to find what might work best for you.
- Weigh the pros and cons. Each method has its good and bad sides. Pick one that fits your needs and skin type.
- Choose wisely. Not all methods suit everyone. Think about your skin, hair type, and how much time you can give.
- Get ready the right way. Preparing your skin can make the treatment more effective and less painful.
- Follow the steps carefully. Using the chosen method correctly is key to getting good results.
- Take care of your skin after. Proper aftercare helps avoid irritation and keeps your skin healthy.
- Keep it up. Regular treatments are often needed to maintain smooth skin.
- Know how to fix problems. If you run into issues, knowing common fixes can help you stay on track.
Understanding Hair Removal
Methods Overview
Hair removal has many faces, from traditional shaving to high-tech at-home laser treatments. Shaving cuts hair at the skin's surface. It's quick but short-lived. Chemical depilatories dissolve hair slightly below the surface, offering smoothness for a few days longer than shaving. At-home laser treatments, however, target the hair's root, promising a more lasting solution.
Mechanical methods like shaving and chemical creams work on the skin's surface or just below it. Light-based removal methods, such as lasers, aim deeper. They disrupt hair growth at its source. Over the years, technology has moved from salon-exclusive devices to compact versions for home use. This evolution means safer, more effective options are now in our hands.
Permanent vs Temporary
The FDA defines permanent hair reduction as a stable decrease in the number of hairs regrowing after a treatment regime, which might not result in the complete absence of all hair. Temporary methods like shaving and waxing remove hair only for a short period because they don't affect the follicle from which hair grows.
Permanent results require time and commitment. Laser treatments often need multiple sessions spread over months to catch all hairs in their growth phase. The promise of permanence comes with patience and persistence.
At-Home Solutions
Today's market offers a variety of at-home hair removal devices and creams. Devices range from IPL (Intense Pulsed Light) to true lasers designed for safe use outside professional clinics. These tools bring convenience and privacy to personal care routines. You can treat yourself on your schedule without stepping foot outside your bathroom.
Comparing costs, these at-home solutions are far more budget-friendly than their salon counterparts over time. While the initial investment might seem high, it pays off by eliminating regular appointments and travel costs associated with professional treatments.
Pros and Cons
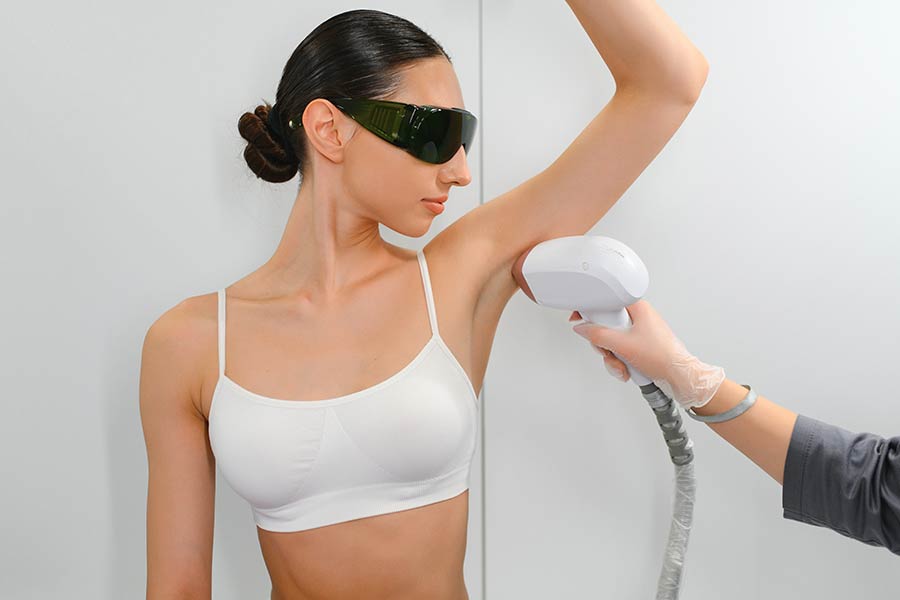
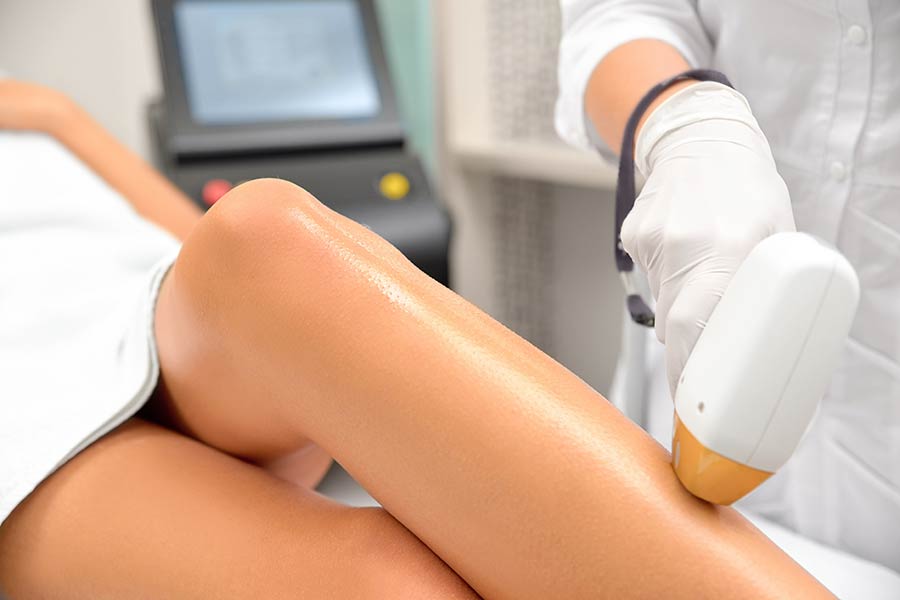
Laser Devices
Laser devices for home use target melanin in hair follicles. This stops hair from growing. There are several types of lasers available. Each works best on different skin and hair types.
It's crucial to follow the guidelines provided by manufacturers. This ensures safety during use. Not doing so can lead to skin damage or ineffective results.
IPL Technology
Intense Pulsed Light (IPL) is not the same as laser technology. It uses a broad spectrum of light. This light targets the melanin in hair just like lasers do. But, IPL is better for a wider range of hair colors and skin types.
IPL devices cover more area than laser devices do. This makes them ideal for larger body parts. Yet, effectiveness may vary based on individual characteristics.
Creams and Lotions
Depilatory creams dissolve hair at the surface level. They're easy to use but only provide temporary results. Users must apply these creams frequently to maintain smooth skin.
Skin irritation is a common side effect of these products. Always do a patch test before full application to avoid adverse reactions.
Waxing Kits
Waxing pulls hair out from the root. This method offers longer-lasting results than creams or lotions do. Results can last up to several weeks.
Waxing can be painful, especially for first-timers. Techniques like applying ice or using numbing sprays can help reduce discomfort.
Choosing the Right Method
Skin Type Considerations
When picking a permanent hair removal method for home use, your skin type plays a vital role. Some technologies, especially light-based ones like IPL (Intense Pulsed Light) and laser, may not work well on darker skin tones. They can mistake the pigment in the skin for the hair follicle, leading to burns or scars.
For individuals with darker complexions, it's crucial to choose devices designed with safety features that prevent these risks. Otherwise, there's a higher chance of experiencing hyperpigmentation or scarring. Always read device specifications carefully or consult with a dermatologist to avoid unwanted side effects.
Hair Color and Texture
Not all hair colors respond equally to at-home permanent hair removal methods. Light-based treatments often struggle with blonde, red, and gray hair due to the lack of melanin. These colors don't absorb the light as effectively as darker hair does, making treatment less successful.
The texture of your hair also influences which method will be most effective. Coarse hair might require higher energy levels or more sessions than fine hair does. It's important to adjust device settings according to your hair characteristics to achieve optimal results. This customization ensures you get the most out of your chosen method without causing damage to your skin or hair.
Budget and Time
Considering both budget and time is essential when selecting an at-home permanent hair removal solution. The upfront cost of purchasing a high-quality device might seem steep compared to temporary methods discussed in the previous section. However, factor in the ongoing costs of consumables like shaving creams or wax strips for temporary solutions.
Permanent methods demand a significant time investment upfront but offer long-term savings and convenience. Treatments like IPL require multiple sessions spaced weeks apart for full effectiveness. Yet, once you complete these sessions, you'll enjoy smooth skin without the constant need for maintenance.
Preparation for Treatment
Skin Cleansing
Before starting any form of hair removal, it's crucial to begin with clean skin. This step prevents infections and reduces the risk of irritation. Use a gentle cleanser that removes dirt and oil without stripping the skin's natural moisture. Avoid harsh soaps or products containing alcohol as they can dry out the skin, making it more prone to irritation.
It's also important to thoroughly dry the area before proceeding with hair removal. This ensures that any at-home treatment adheres properly and works effectively.
Patch Testing
Patch testing is a must to ensure your skin doesn't react negatively to a hair removal method. Apply a small amount of the product or use the device on a tiny skin area, preferably somewhere discreet. Wait for 24 to 48 hours to see if there's any adverse reaction, such as redness, swelling, or itching.
If you notice any negative signs, stop using the product immediately and consider another method. Interpreting results accurately is key in avoiding potential harm during full application.
Setting Expectations
Understanding realistic outcomes is essential when considering permanent hair removal at home. Most methods require multiple sessions over weeks or months before noticeable results appear. Patience is key.
The effectiveness varies widely among individuals due to factors like hair color, skin type, and the chosen method's compatibility with these characteristics. Some may see quicker results than others, but setting realistic expectations from the start helps manage disappointment.
Step-by-Step Guide
Laser Device Usage
Safety Measures
Before using a laser device, it's crucial to follow safety precautions closely. This includes wearing protective eyewear and avoiding direct exposure to eyes. Ignoring these guidelines can lead to serious skin damage or eye injuries. Understanding the user manual is not optional; it's a must. It provides specific instructions tailored to your device, ensuring you use it correctly and safely.
Treatment Sessions
For permanent hair removal, consistency is key. Typically, you'll need multiple sessions, often ranging from six to eight, spaced four to six weeks apart. This frequency ensures that hair follicles are targeted at different growth stages for effective results. The exact number of sessions varies based on the treatment area and the device used. Sticking to the scheduled treatments is crucial for achieving smooth, hair-free skin.
Treatment schedules must be consistent. Skipping sessions can prolong the process and diminish effectiveness. Each body part may react differently, so adjustments in session frequency might be necessary.
Aftercare Instructions
After each session, soothing the skin is important. Aloe vera gel or a cooling cream can reduce redness and discomfort. Avoid sun exposure and do not use other hair removal methods like waxing between treatments as they can irritate the skin.
Stay clear of hot showers or saunas immediately after treatment. These activities can further irritate treated areas.
IPL Technology Application
Using an IPL device at home starts with selecting the right intensity level for your skin tone and hair color; this ensures effectiveness while minimizing risk of damage. Here’s how to proceed:
- Test a small skin area first.
- Choose the correct intensity level as advised in the manual.
- Apply the device in a systematic manner across the treatment area.
- Use cooling gels if needed post-treatment.
The importance of selecting the correct intensity cannot be overstated; it makes treatments safe and more effective.
After completing the initial phase of treatments, regular maintenance sessions are necessary to keep new hair growth at bay. These might be once every two months or as recommended by your device's manufacturer.
Aftercare Tips
Moisturizing Routine
After removing hair, keeping skin hydrated is crucial. It helps in healing and maintaining smoothness. Use moisturizers that are gentle and free from harsh chemicals. Products containing aloe vera or other natural soothing agents are ideal. They offer deep hydration and calm the skin effectively.
Aloe vera, in particular, speeds up the healing process and reduces irritation. It's perfect for sensitive areas. Remember, a good moisturizing routine keeps your skin happy after hair removal.
Sun Protection
Post-treatment, your skin becomes more vulnerable to the sun. It's essential to protect it to prevent damage. Use a sunscreen with at least SPF 30 on treated areas every day. Even on cloudy days, UV rays can harm your skin.
Reapply sunscreen every two hours if you're outside. Freshly treated skin is especially sensitive to UV rays, increasing the risk of sunburn and dark spots. So, don't skip this step.
Addressing Sensitivity
It's normal for your skin to feel sensitive after hair removal. To reduce discomfort, apply cool compresses and wear loose clothing. Avoid hot showers and saunas for a few days as well.
Watch out for signs of abnormal reactions like severe redness or swelling. These might require medical attention. If your skin becomes too sensitive, consider adjusting the treatment frequency or method based on your comfort level.
Maintaining Results
Touch-Up Sessions
After finding the right at-home permanent hair removal method, it's crucial to keep those results. Touch-up sessions play a big part in this. They ensure your skin stays smooth longer. Most methods need touch-ups, but how often varies. For laser treatments, you might need a session every 6 to 12 months. With electrolysis, less frequently.
Over time, you'll notice these sessions become less needed. This is because permanent methods reduce hair growth with each treatment. It means fewer hairs to deal with and less frequent touch-ups.
Monitoring Skin Health
Keeping an eye on your skin's health is just as important as the initial treatment. Regular checks help catch any adverse effects early. Look for signs of infection like redness or swelling. Significant irritation could also be a sign something's not right.
If you spot anything worrying, it's time to get professional advice. Remember, aftercare tips from the previous section can prevent many issues. But sometimes, expert input is necessary to ensure your skin stays healthy.
Combating Regrowth
Even with permanent hair removal, some regrowth is normal. It doesn't mean the treatment failed; it's just how bodies work sometimes. The key is managing this regrowth effectively.
Strategies include using temporary hair removal methods between touch-ups or going for another session sooner if needed. Understanding that some regrowth doesn't equal failure helps set realistic expectations.
Troubleshooting Common Issues
Skin Irritation
Skin irritation often follows at-home hair removal. Common causes include sensitive skin, improper technique, or allergic reactions to products. Itchy, red skin can be alarming but is usually manageable.
To soothe irritated skin, apply aloe vera or a gentle moisturizer. These products can calm the skin and reduce discomfort. To prevent future occurrences, test products on a small area first and ensure the hair removal device is clean.
If irritation persists or worsens, it's time to stop using the method. Severe reactions may require medical attention. Always prioritize your skin's health over hair removal goals.
Ineffective Results
etimes, despite efforts, results fall short of expectations. This could stem from incorrect device settings, hair color and texture mismatches, or not following instructions properly.
Troubleshooting with adjustments to the device settings or technique can make a big difference. Read the manual again or watch tutorial videos for tips. Consistency in treatment sessions also plays a crucial role in effectiveness.
There are moments when switching methods becomes necessary. If after several attempts results don't improve, consider consulting a professional. They can offer advice tailored to your specific needs and suggest alternative solutions.
Device Malfunctions
At times, devices may not work as expected due to malfunctions. Before panicking, check if the issue is something simple like needing a charge or replacing a part.
For more complex problems, refer to the product’s warranty and contact customer support. Good companies often provide helpful troubleshooting tips or replacement options.
When a device no longer functions and cannot be fixed, look into safe disposal or recycling options. Many electronics stores offer recycling programs for such gadgets. Proper disposal ensures environmental safety and makes room for newer, more effective devices.
Additional Advice
Professional Consultation
Seeking advice from a dermatologist or hair removal expert is wise. They can tailor a plan just for you. Sometimes, at-home treatments need a professional touch to work best.
Professionals are crucial if you face skin issues after using at-home devices. They help ensure your skin stays healthy. In some cases, their guidance can make treatments more effective and safer.
Upgrading Devices
Knowing when to get a new hair removal device is important. If your current one is old, it might not work as well. Newer models are often more efficient and safer for your skin.
The latest devices offer better results with less discomfort. Deciding to upgrade can be smart financially too. It might cost more upfront but save money in the long run by reducing the need for professional treatments.
Lifestyle Adjustments
Your daily habits affect hair growth and health. Eating well and managing stress can help make hair removal more effective.
Here are some tips:
- Drink plenty of water.
- Try to reduce stress in your life.
- Keep up with your hair removal schedule.
These changes support the efforts you're making at home. Being consistent with both treatment and lifestyle choices leads to the best outcomes.
Closing Thoughts
Diving into the world of at-home permanent hair removal can feel like setting sail on uncharted waters. But, armed with the right info and tools, you're more than ready to captain your ship. From weighing the pros and cons to mastering aftercare, you've covered serious ground. Remember, it's all about finding what works best for you and sticking to it. Sure, you might hit a few snags along the way, but that's just part of the journey. Keep your eyes on the prize: smooth, hassle-free skin.
hat's next? Time to take action! Grab that hair removal device, follow your step-by-step guide, and embark on this adventure. And hey, if you ever feel lost at sea, revisit these tips or reach out to fellow voyagers. You've got this—smooth sailing ahead!
Frequently Asked Questions
What methods are available for permanent hair removal at home?
There are mainly two methods: laser hair removal devices and intense pulsed light (IPL) gadgets. Both target the hair follicle to prevent regrowth, but they work a bit differently. Think of laser as a sniper—precise and targeted, while IPL is more like a shotgun blast—broad and covering more area.
How do I choose the right method for me?
Consider your skin and hair type. Laser works best on light skin with dark hair, whereas IPL can be more versatile but may require more sessions. It's like picking between tea or coffee in the morning; what works best for you might not suit someone else.
Is there any prep work needed before undergoing at-home hair removal?
Yes, you'll want to shave the area 24 hours before treatment. Clean skin without lotions or oils is key—think of it as prepping a canvas before painting. This ensures the device works effectively.
Can you walk me through a step-by-step guide for using an at-home laser or IPL device?
Sure! First, test the device on a small area. If all’s good, select the recommended intensity level for your skin tone and start zapping away section by section. Imagine you're erasing unwanted doodles from your skin, slowly but surely.
What should I do after treating an area for hair removal?
Apply a soothing gel or cream to calm any irritation—think of it as giving your skin a nice, comforting hug after a bit of stress. Avoid sun exposure like you’d dodge rain without an umbrella; your skin will be extra sensitive.
How can I maintain my results over time?
Consistency is key—follow the treatment schedule recommended by your device’s manufacturer to the letter. It’s like watering plants; stick to a routine to keep your garden flourishing.
What if I encounter issues like redness or bumps after treatment?
Don’t panic! Apply cool compresses or an over-the-counter hydrocortisone cream if necessary. Think of these bumps as little hurdles on your journey to smooth skin—they’re common and usually easy to deal with.
Any additional advice for someone new to at-home permanent hair removal?
Start slow and always read the manual first—it's like getting directions before a road trip. And remember, patience is crucial; Rome wasn't built in a day, and similarly, achieving silky smooth skin takes time.